
Monday, June 13, 2011
Selling Clothes on Etsy!
Sorry for the short post...more exciting ones to come, promise! But I wanted to share that I'm selling some of the clothes I made for G on Etsy. And don't judge my half-hazard pictures and descriptions, I just threw them out there for now. I've had alot of people interested on Facebook and from my blog so I wanted to get the posted when I had a few, quiet moments! Enjoy-and check back soon for an actual sewing post ;-)

Tuesday, May 10, 2011
DIY Kids Play Kitchen
G's first birthday is on Thursday; Jeff and I wanted to make her something extra special. I found a picture of a play kitchen made out of an old TV stand on Giggleberry Creations; the blog and fell.in.love! I knew we could make one for G and it would be something that will grow with her for many, many years. And just days before the big day, we finished it!
Drum roll please..........
TADA!


A lot of people have asked for a tutorial or 'how to' on this kitchen...most of the work was pretty self explanatory but I'll go over some of the things we did.
The total kitchen cost was between $80-$100 (I didn't keep a running total). However, you can make it as cheap or expensive as you want. The first thing we did was look on Craigslist for a tv entertainment stand. I purchased the cheapest one on there ($30) and it turned out to be the biggest one too! G can't turn on the faucet and barely can reach into the sink. Right now she's really just into opening all the doors and turning the knobs. We also purchased most of our items at our local Restore, which sells discounted construction supplies.
The fridge: I wanted to make her fridge magnetic just like a real fridge. I used 3 coats of magnetic paint and it worked really well. The paint is quite thick so try to do thin coats. We used a simple silver spray paint for the top coat of the fridge. The handles for the stove and fridge were just cheap ones from the Restore!
The countertops: I wanted to use the leftover glass tile we had put into our master bath; we had just enough to do a small backsplash! The countertops are 24"x24" vinyl (peel and stick) tile. We purchased an old faucet from the Restore and used a silver bowl for the sink. The stove top is a piece of wood spray painted silver and then I painted black circles on it for the burners. We bought wooden knobs from the Restore and painted them black-for the stove knobs.
The window: Jeff had an old golf calendar and we used one of the pictures from that for the window. The casing was just stuff we had left around our house.
The clock: This is my very favorite part of the kitchen and it was also the easiest! I used my Cricut to cut out the numbers onto Vinyl Transfer Tape from Joann's. I love the vinyl transfer tape because it's basically a big sticker! After the Cricut cuts out the number, you just peal off the backing and stick it on the wall! It's fantastic! I purchased a simple wall clock from Wallie Mart for $3.97 and my husband took the hands and mechanical box out of the clock- the mechanical box will have a pole in the center. Then he drilled a whole into the center of the clock on the kitchen wall and stuck the pole through the hole while I attached the hands back to the pole. Then we inserted a battery and it was done! (I know...this makes no sense to you right now but once you get a clock it will all make sense!)
That's about it! It took us a good 6 weeks but we rarely worked on it. It was an easy and fun project to do. I'm so excited for G to get all her kitchen goodies for her birthday so we can start playing kitchen!!
Now go make one for your kiddos and post a pic for me to see!
Drum roll please..........
TADA!
I absolutely love how it turned out. The fridge is magnetic and Jeff had to add the first magnet-a Iowa Hawkeye one, of course! The clock really works and this lucky little girl gets to look out her window to a beautiful golf course. We even added a growth chart to the side (made with Vinyl Transfer Tape and my Cricut)
The total kitchen cost was between $80-$100 (I didn't keep a running total). However, you can make it as cheap or expensive as you want. The first thing we did was look on Craigslist for a tv entertainment stand. I purchased the cheapest one on there ($30) and it turned out to be the biggest one too! G can't turn on the faucet and barely can reach into the sink. Right now she's really just into opening all the doors and turning the knobs. We also purchased most of our items at our local Restore, which sells discounted construction supplies.
The fridge: I wanted to make her fridge magnetic just like a real fridge. I used 3 coats of magnetic paint and it worked really well. The paint is quite thick so try to do thin coats. We used a simple silver spray paint for the top coat of the fridge. The handles for the stove and fridge were just cheap ones from the Restore!
The countertops: I wanted to use the leftover glass tile we had put into our master bath; we had just enough to do a small backsplash! The countertops are 24"x24" vinyl (peel and stick) tile. We purchased an old faucet from the Restore and used a silver bowl for the sink. The stove top is a piece of wood spray painted silver and then I painted black circles on it for the burners. We bought wooden knobs from the Restore and painted them black-for the stove knobs.
The window: Jeff had an old golf calendar and we used one of the pictures from that for the window. The casing was just stuff we had left around our house.
The clock: This is my very favorite part of the kitchen and it was also the easiest! I used my Cricut to cut out the numbers onto Vinyl Transfer Tape from Joann's. I love the vinyl transfer tape because it's basically a big sticker! After the Cricut cuts out the number, you just peal off the backing and stick it on the wall! It's fantastic! I purchased a simple wall clock from Wallie Mart for $3.97 and my husband took the hands and mechanical box out of the clock- the mechanical box will have a pole in the center. Then he drilled a whole into the center of the clock on the kitchen wall and stuck the pole through the hole while I attached the hands back to the pole. Then we inserted a battery and it was done! (I know...this makes no sense to you right now but once you get a clock it will all make sense!)
That's about it! It took us a good 6 weeks but we rarely worked on it. It was an easy and fun project to do. I'm so excited for G to get all her kitchen goodies for her birthday so we can start playing kitchen!!
Now go make one for your kiddos and post a pic for me to see!
Thursday, May 5, 2011
Knot Shorts
My new favorite item for G's summer wardrobe...knot shorts! I am in.love, plus the best part is they are super easy to make. I was a little overwhelmed at first because I had to make my own pattern. But that was incredibly easy, Meg does a great job explaining everything.
G already has two pairs! I whipped up for the first pair with some scrap fabric-just to make sure I had my pattern right. They turned out really cute but on my second pattern I made the ties longer (and they could still be longer on her second pair!)


G already has two pairs! I whipped up for the first pair with some scrap fabric-just to make sure I had my pattern right. They turned out really cute but on my second pattern I made the ties longer (and they could still be longer on her second pair!)


G is wearing the second pair for her 1-year photo shoot tomorrow! I can't wait to see her little booty in these!
By the way...don't forget to visit Grosgrain's Blog-30 free patterns for 30 days!!

Friday, April 22, 2011
Hobo Sack
Sorry-pic taken from my phone!
Dana from Made did a great job with the tutorial. It was very easy to follow and didn't take long at all. I originally made one from her dimensions but it was tiny. I went ahead and whipped up another one that was 13 x 16. It's the perfect size and will be perfect for me to fill with some books, trucks, etc for the birthday boy!
I also added a monogram letter-which was incredibly easy! I didn't take pictures during these steps but I'll explain what I did.
1.) I used my Cricut Cutter to cut out a T on normal paper.
2.) I cut a piece of red knit fabric
3.) I placed the piece of paper (freezer paper works better because you can iron it on, but I didn't have any one hand).
4.) I used a large paint brush and white fabric paint, and painted on the T!
5.) Yes, pretty self explanatory. My Cricut made it extra easy.
I really hope he loves his new, personalized bag! I know it's now my favorite new birthday gift to give-I may be making every kiddo I know one for their birthday!
Sunday, April 17, 2011
Ruffle Sandal Tutorial

While shopping at Kohl's the other day I ran across these Vera Wang sandals-and instantly fell in love with the ruffles. G was being a crab pants (hello nap time!) so I headed for the check out without giving them another glance.
Then today I was in the mood to craft, but do something simple and the Vera Wang sandals
came to mind. I immediately started this project....

What you need:
*Scrap tulle, jersey knit and felt (or any fabrics-I just chose ones that didn't fray)
*Hot glue gun
*Paint (optional)
*Old, worn down sandals
I bought these sandals last year and wore.them.out. I was about to throw them out when I had an idea-I'll upcycle them!
First-I traced around the top of the strap of the sandal with felt. I chose n
ot to cover the sides of the straps, but that is up to you. Then, I cut out the felt.

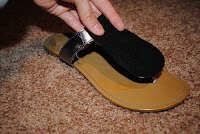
Second-I painted the straps that wouldn't be covered in fabric. I have no idea how well the paint will hold up, I'll keep you guys updated. I just used a wall paint I had in

the basement.
Third-While the straps dried I cut two piece of black tulle (15"x3" each) and two pieces of black jersey knit (15"x3" each). I sewed the tulle on top of the black jersey knit, making it ruffle as I went, simply by bunching up the fabric together under my foot on my sewing machine. This was the easy way out-but it turned out great! (Do this twice, one for each sandal)

Fourth-Now take the felt and sew the ruffle piece onto the felt.

Fifth-Make sure your paint is dry! Once it's dry cover the top of your sandal strap in hot glue and place the felt onto the hot glue.


Sixth-Go get a pedicure! Atleast I know after seeing these pictures, I need one!
Now model your shoes for everyone you know and redo every ugly, worn out sandal your family owns-you know you want to!! :-)
(Side note...this is one of my first tutorials so bare with me. If it's confusing please feel free to let me know, and I'll clarify!)
Saturday, April 16, 2011
Pockets & Petal Sleeves
I just finished this little dress for G. And I LOVE it! I didn't use a tutorial or pattern so I'm thinking about whipping one up for you ladies. But I'll leave you with my grumpy, grumpy, little girl and her adorable dress. Enjoy!

My VERY Favorite Pants
My latest sewing adventure has been her "Good Looking" pants. I made my first pair with some scrap home decor (heavy weight) fabric. The pattern on the pants is a bit crazy, but they did turn out super cute! I used a pair of stretch leggings as my template-which made the pants a bit snug. The second pair I made, I added too much and now they are a bit big! One more try and I'm sure I'll get it just right.
My tips?
*Make sure you exaggerate the steep rise in the back of the pants. Both pants on G are just a bit small in the butt because of her diaper booty. Better big than small-next time I'll
exaggerate the steep rise even more!
*I used home decor fabric and it worked great!
*Make sure you don't do two right pant legs...that's what I did the second time. Frustrating! (This was my fault...the tutorial is very simple, I was just rushing to get the pants done before nap time was over!)
Oh-you want pictures?! Of course!!! Here's the first pair made with my scrap fabric....

And the pair I made out of teal home decor fabric...they needed some major hemming!

After the hem, now off to take the sides in a bit :-)

Subscribe to:
Posts (Atom)