Pages

Friday, December 30, 2011

DIY Embellished Shoes

I love shoes, what girl doesn't? But being a stay-at-home mom
means I don't get to spend as much $$ on them as I used to!  

When I saw this picture pinned on Pinterest, I knew I had to
make myself a pair! 

Photo courtesy of Starsforstreetlights
your own pair! They were really easy to make. I used 
some hot glue on mine too, just to make sure the material
was on there really good :-) 

I bought a pair of flats at Target on clearance for $7.48. 
I used some scrap fabric and got to work! It was really simple
and instead of a bow I opted for just a knot with tails. A little less
frilly and bulky, more my style! 


Pure awesomeness for under $8. 

Thursday, December 29, 2011

Stroller Refashion

And I'm back!! Who missed me?! 

I wish I could say I took a bit of time off from blogging to spend time with my 
family and just relax, but that would be a lie. I did spend lots of time with 
my family but not much relaxing was done... I had a million gifts to make, 
and buy, and wrap. 6 Christmas' to attend. Ya know, the usual.

But I'm back and should be back to regular blogging now!  

What was my first project after the holidays? A stroller refashion!

I was hoping to get this done for Gianna before Christmas but
that didn't happen. Oh well, Gianna didn't know the difference.
She's just happy she has a stroller that her babies don't fall out of!

Back to the stroller refashion....

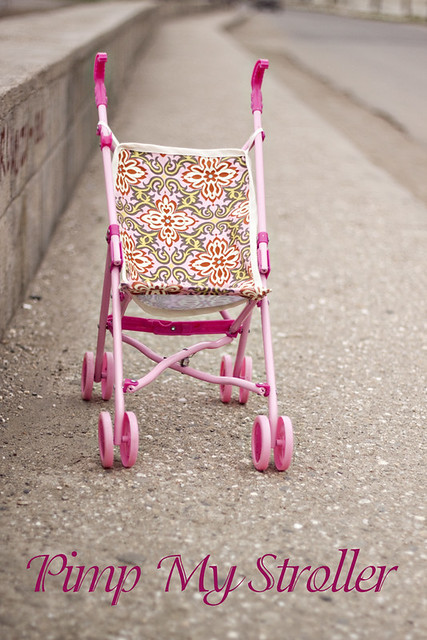
A favorite blogger of mine, Sewing in No Man's Land, did a 
'pimp my stroller' post a while ago. 


Since then I've been wanting
to fix Gianna's stroller cover. We bought the stroller from Goodwill
and a few days later the cover started falling apart, of course!
But, for a few bucks, I couldn't complain. 

I grabbed some bias tape and scrap fabric from my stash
and set to work! The great thing about the 'pimp
my stroller' tutorial is that she even includes a free pattern!

It's a really easy tutorial to follow, even for the beginner sewer.
Plus, kiddos don't usually care if there are a few mistakes,
which makes this a great learning experience! 

Mine turned out ok...not as good as I expected.
But I did have a 18 month old trying to help, so I guess 
I can blame her for my mistakes ;-)


Saturday, December 17, 2011

50% off Patterns at Shwin Designs!!!

I just stopped over to check out Shwin's new project and she's having a
SALE! 50% off ALL her patterns! That's less than $2.50 per pattern. 
Of course, I bought 3 for $7.42, best deal around!


I already have one pattern and used it to make this adorable
coat for one of Gianna's friends!


Tuesday, December 6, 2011

100 DIY labels for under $10

I used to buy sew-on labels from Etsy. 
They were great, but I really wanted iron on ones.

I didn't want any mommy's to worry about those itchy labels
on the clothes I made! So what do I do?

Make my own, of course!

What you'll need:
an image of what your labels will look like
(I found a picture on the internet and then wrote Gia Rose Designs
on top. Easy and cheap)


Dark Iron on Transfer Paper
(I purchased Next Fashion brand from Walmart)
Computer & Printer
Color ink for your printer
Iron

Are you ready for how easy this is?

Open a Microsoft Word document and insert the image of what your labels
will look like. You can copy & paste it multiple times. I did 21 labels
on my first sheet and then realized they were a bit big! Second time around I 
made them smaller and fit 32 on a page. 
*For the brand I used, I did not have to 'mirror' my image.
Please check your instructions before printing. 

Now print your labels on to the transfer paper. 
I used dark iron on transfer paper so that I could iron them on dark clothing
and still have the label show. Plus, you can iron these over clothing labels! 

Next you'll want to cut out your labels. Make sure not to leave alot of white 
border around your image, because that will show when you iron it on your item. 

Now you'll want to follow the directions on the package. For the brand I bought, you 
peal off the backing on the transfer paper. It will peal right off like a sticker.
Then you lay it on your top, lay the parchment paper on top and iron away!

Ta-Da! Your done!

Now how easy was that?  I'm so excited to add them on to future projects!

This label was one of the large ones... a bit too big!


Monday, December 5, 2011

The Grinch Tee

I wanted something fun and cute for Gianna to wear for Christmas.

When I stumbled upon a Grinch tee, on pinterest, I was in love! 


Follow along and make your own!

Supplies:

Grinch Picture (I used this one):

Wonder Under; I sewed along my edges. If you don't
want to sew along your edges, get the heavy duty stuff!

T-shirt or Onesie
Thread
Fabric (Red & Green)
Permanent Marker
Felt (Yellow & Black & White)
Buttons (2 black)
Pencil

Instructions:
1.) Print out your grinch picture onto normal printing paper.
Or you could be cool and use pink paper like me ;-)

2.) Trace (on the smooth side of the Wonder Under) the grinch's face,
then the grinch's hat and lastly the grinch's fur on the hat. You'll need
3 seperate pieces of Wonder Under for each of these


3.) Iron the Wonder Under that you traced your pictures onto, on the 
WRONG side of the fabric. Make sure on the face you leave extra room at the top,
and on the hat leave extra room on the bottom. These pieces will be on the 
bottom, while the fur of the hat with lay ontop of them. Make sense?
My grinch's face was on green, hat on red and fur on white flannel. 
All fabric was purchased from Joann's. 

4.) Once they are ironed on really well, cut each piece out. Make you sure cut
slowly and cleanly alone your pen lines. 
This image is showing, right side up, on my computer.
Why is blogger is it sideways?!
5.) Now you'll want to cut your eyes and eyebrows for the grinch. I just eyed it;
I didn't trace anything. Just keep looking from your picture to your felt
while cutting. These do not need to be ironed with Wonder Under. I used
liquid stitch to attach the extra pieces to the shirt. 

6.) Kind of play around with the placement of the eyes, eyebrows, etc. 
If you have a disappearing ink pen, that may help too with drawing his mouth
and nose, before using the permanent marker to draw it on. 


7.) Once you know the grinch looks just right, take a picture. You'll
want it to look back on when ironing the pieces on.

8.) Now carefully pull off the Wonder Under from the fabric. It should come
off easily and leave a super smooth surface on the back. If it doesn't come off easily,
try ironing it some more and then letting it cool.

9.) Now it's time to iron Mr. Grinch onto your shirt! Take your time!

10.) Once the hat, face and fur are ironed on you can stitch around it.
I did so, but you don't have to.

1l.) Now you'll use your liquid stitch to attach the eyes and eyebrows. 
Use hot glue on the buttons, then also stitch them on. You want to make
sure the buttons are really secure so your little one doesn't rip it off the shirt
and try to eat it! (Trust me, I learned from experience!)

Now you're shirt is done! It's actually must easier than it looks!
Plus, think of all the different characters you could use for future shirts!
The possibilities are endless!


I also added a paper bag style skirt to go with my Grinch tee!
Lemon Squeezy Home has a great tutorial on her blog!

Hopefully Gianna gets to feeling better and I can have
her model her new outfit for you! Hopefully pictures of 
that to come!


Wednesday, November 30, 2011

$5.00 Infinity Scarf

I've been seeing all these adorable infinity scarves on Pinterest.
This flannel one caught my eye...very simple and cozy.

Photo courtesy of Brittanymakes.com
Scarves are honestly the best. Pair them with jeans, 
flats, stud earrings and a plain tee and you've got a simple,
comfortable outfit. Perfect for any mom on the go!!

Comfy Classic


Now I'm in love with the pink & cream sweater scarf...
I need to find material like that!

Back to the tutorial....
I, however, didn't have a pair of old flannel pants so I hit up
Joann's and got 1yd of flannel fabric for about $5 (with coupon). 


Here's a short tutorial on how to make your own!

1.) First lay your fabric out flat and fold it over, hot dog style, 
right sides together

2.) Sew along the longest edge. 

3.) There are two sides left unsewn, so right now it's a tube.
Take one edge and bring it through the tube to the other edge, again
right sides together. **Leave a 3 inch gab at the end, so you
can turn your scarf right side out.

4.) Turn scarf right side out through gap.

5.) Slip stitch or machine stitch the gap closed. 

And....you're done!!

So simple, so easy, so cute. 


It even can be worn as a hood on those frigidly cold winter days!


If you love this, but don't want to make it yourself. I'll be selling
some, on request, for $12-$15. Just email me at
giarosedesigns@gmail.com!

Saturday, November 26, 2011

DIY Cast for Doctor's Kit

Awhile ago, I made Gianna a Doctor's coat to go with her 
Doctor's kit I bought her for Christmas. 


And then this weekend my mom had this genius idea, to add her kit...
a DIY play cast!!

She bought some Go-Go boot covers on clearance after
Halloween.  First they were just going to be thrown in Gianna's
dress up bin, but they she mentioned I should just make them into a cast
for her doctor's kit! Can you say, genius?!

Mine were similiar to this, only it already had the elastic around the bottom.


I added elastic to the top, to keep it up the teeny tiny kiddo thighs. 
And ta da! Cheap, easy DIY Cast. The kids are going to love playing with this!

Friday, November 25, 2011

Items for Sale

I have a few items for sale that Gianna has outgrown.
Trying to make room for a few new patterns!!

Prices are negotiable and multiple item discount
is available! 

All the items have small defects, since Gianna gets to 
be the guinea pig for all my patterns! 

Email me at giarosedesigns@gmail.com if you are interested!

Here's the link.....

Sunday, November 20, 2011

Dress Up Bin

One of Gianna's big Christmas presents was a 
DIY Dress Up Bin. I love.love.love how it turned out.


My wonderful husband build, with a little help from Ana-White!
You can find the plans, building material list, approx. 
cost of materials, etc on Ana-White.com. Just search

I painted mine with left over paint from Gianna's Birthday Kitchen
and used my Cricut to cut out the letters. 

I also added two hooks, to keep hats, jewerly and other accessories!


The fun part was finding odds & ends to put in the dress up bin!
The 'bin' part is perfect to hold all those extra stuff you can't hang up!

I bought a few things from The Dollar Tree; a tutu, princess slippers,
crown, a clown tie (to dress up as a business man), and jewelry. 


I found a few good things (old costumes, mostly) at Goodwill, Craigslist and
 Garage Sales. It's a bit late now, but I picked out a few old costumes from
the clearance section at Walmart and Target. You can't beat $2 for a pretty
princess dress! 

Of course, I had to make a few things too! An apron/chef hat and, my 
favorite, the doctor coat! This week Walgreen's has BOGO Free
on some toys, including a great doctor's set! Talk about a cheap gift :-)


When Gianna's a bit older, and can really appreciate it, I'll make her
some beautiful princess gowns to add to her dress up bin! 

Photo courtesy of HomadebyJill


I can't wait to see her playing with all her new dress up clothes and 
accessories. I'm positive she'll love it!!

Saturday, November 19, 2011

Funky Elmo Pj Pants

I need to stop thinking of Christmas presents so early. Because
I just keep finding more ideas! Seriously, Gianna is beyond 
spoiled this year. It's getting a bit ridiculous. 

With that said, Jeff or I have made all her presents!
Stayed tuned, I'll be posting pictures of everything as
they get done!

Back to the Funky Elmo Pj pants!
 

I made Gianna and her dolly some matching pjs. 

For her doll (American Girl Bitty Baby) I used The Blueberry Moon's
Nakey Baby Pant Pattern. She even has a print out pattern,
which makes sewing up a pair of doll pants incredibly easy!
Her blog also features some other doll clothes, which all include
free printable patterns! Definitely jump over there and check it out!


For the top I took a newborn onesie and cut off the bottom,
to make it into a top for the doll. Then I appliqued a square
from the fabric! Easy peasy!!


Now onto Gianna's Funky pj pants! I'll admit, they are a bit...wild.
But no one will see them but us, so who cares?! Plus, G can't 
resist anything with Elmo. 

I found this pattern for free on Pinterest, you can bring it off
and then there's a tutorial on sewing it up. Super easy. 
Thanks FleeceFun for some great free patterns!

Photo from FleeceFun.com
The pink with lace is pretty cute!


Gianna is in size 12-18month (18 months old). I used the 2T
pattern but took off a 1/2 inch on the sides. I shouldn't have done 
that though. Right now they fit perfect, but probably not for long!

I tried them on Gianna, just quick enough to snap a few pics
and make sure they fit. She won't remember on Christmas, right?!


They look a bit crazy and wild! Next time I'll make them with 
a simpler fabric. Otherwise, they are the perfect pj's! 

I may have to make her a pair like the ones pictured about...they are 
pretty dang cute!


Monday, November 14, 2011

The Lovebird Tunic

When I saw the "Lovebird Tunic' that Jess over at
Craftiness is Not Optional made, I knew I had to make one!

Better yet, I knew that I had some fabric in my stash that would work perfect!

Keepsake Calico Fabric-Green Berries
from Joann's

Jess has a tutorial to make your own Lovebird Tunic. I made one 
for G, and although the neckline is a bit messed up, I love it!


She wore it the other day with jeggings and boots...oh my goodness.
She looked freakin adorable! I snuck some pics at the mall of her. 
Yup, I'm that crazy mom.

Checking herself out in the mirror at Gap.
Gotta be just like mom! Putting
on some lip gloss after lunch!

Thursday, November 10, 2011

Felt Flower Clips


Gianna is getting a bit of a mullet. I always have to pull her bangs 
back so her hairs looks a bit more 'tamed' (if that's even possible!)

A crafty friend of mine, Lindsey, at My Handmade Gifts
crocheted these adorable little flowers for me! I love them, 
and best of all they are so inexpensive (6/$8)!! Plus, they 
don't slip out of fine/thin baby hair because of the felt!
(Can you tell I'm just a little bit excited about this)

Here's a little tutorial on how to make your own. 

Supplies:
felt
crochet flower
embroidery floss
needle
hot glue
hair clip

First trace your hair clip onto the felt, twice. And cut them out.

Then you'll cut a little slit in one of the felt pieces, because
you'll slide the top part of the clip through it. 
(See picture for better explanation!)

Next glue the top piece onto the barrett. Try to 
stay away from the edges where the embroidery floss will be;
the glue makes it harder to stitch through.

Also, do not glue the felt onto the widest part of the barrett.
(again, see below)
Don't glue that part down yet!

Hair clip closed....
Hair clip opened, after gluing. 
Next you'll take your needle and embroidery floss.
Thread your needle and stitch around the edges, through both
pieces of felt. This is just decorative stitching for looks. 

Next you'll take the ends of your embroidery floss
and glue it between the felt and the wide part of the barrett.
This will just keep the floss from unraveling. 
Take the ends and hot glue it to the felt and barrett.


After gluing!
Next you'll glue your crocheted flower to the top of the barrett! 
And your done!! Tada!!


And don't forget to order your flowers from 
My Handmade Gifts! If Lindsey doesn't have any available
in her Etsy shop, just email her! She's so great 
and so fast at completely orders!

(And no, she did not ask or pay me to do this review!)
(I just love her stuff so much, I had to share!)