Pages

Friday, April 22, 2011

Hobo Sack


I was trying to think of something different and fun to give my cousin's son for his birthday (he's turning 2). A million ideas ran through my mind and then I found this tutorial-for a hobo sack! What kid doesn't love a bag to carry around all their goodies in?
Sorry-pic taken from my phone!

Dana from Made did a great job with the tutorial. It was very easy to follow and didn't take long at all. I originally made one from her dimensions but it was tiny. I went ahead and whipped up another one that was 13 x 16. It's the perfect size and will be perfect for me to fill with some books, trucks, etc for the birthday boy!

I also added a monogram letter-which was incredibly easy! I didn't take pictures during these steps but I'll explain what I did.

1.) I used my Cricut Cutter to cut out a T on normal paper.
2.) I cut a piece of red knit fabric
3.) I placed the piece of paper (freezer paper works better because you can iron it on, but I didn't have any one hand).
4.) I used a large paint brush and white fabric paint, and painted on the T!
5.) Yes, pretty self explanatory. My Cricut made it extra easy.

I really hope he loves his new, personalized bag! I know it's now my favorite new birthday gift to give-I may be making every kiddo I know one for their birthday!

Sunday, April 17, 2011

Ruffle Sandal Tutorial


While shopping at Kohl's the other day I ran across these Vera Wang sandals-and instantly fell in love with the ruffles. G was being a crab pants (hello nap time!) so I headed for the check out without giving them another glance.

Then today I was in the mood to craft, but do something simple and the Vera Wang sandals
came to mind. I immediately started this project....


What you need:
*Scrap tulle, jersey knit and felt (or any fabrics-I just chose ones that didn't fray)
*Hot glue gun
*Paint (optional)
*Old, worn down sandals

I bought these sandals last year and wore.them.out. I was about to throw them out when I had an idea-I'll upcycle them!

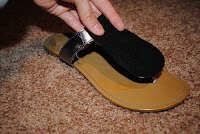
First-I traced around the top of the strap of the sandal with felt. I chose n
ot to cover the sides of the straps, but that is up to you. Then, I cut out the felt.


Second-I painted the straps that wouldn't be covered in fabric. I have no idea how well the paint will hold up, I'll keep you guys updated. I just used a wall paint I had in

the basement.

Third-While the straps dried I cut two piece of black tulle (15"x3" each) and two pieces of black jersey knit (15"x3" each). I sewed the tulle on top of the black jersey knit, making it ruffle as I went, simply by bunching up the fabric together under my foot on my sewing machine. This was the easy way out-but it turned out great! (Do this twice, one for each sandal)


Fourth-Now take the felt and sew the ruffle piece onto the felt.


Fifth-Make sure your paint is dry! Once it's dry cover the top of your sandal strap in hot glue and place the felt onto the hot glue.

Sixth-Go get a pedicure! Atleast I know after seeing these pictures, I need one!

Now model your shoes for everyone you know and redo every ugly, worn out sandal your family owns-you know you want to!! :-)

(Side note...this is one of my first tutorials so bare with me. If it's confusing please feel free to let me know, and I'll clarify!)

Saturday, April 16, 2011

Pockets & Petal Sleeves

I just finished this little dress for G. And I LOVE it! I didn't use a tutorial or pattern so I'm thinking about whipping one up for you ladies. But I'll leave you with my grumpy, grumpy, little girl and her adorable dress. Enjoy!

My VERY Favorite Pants


I love to follow SewIn-NoMansLand...she has super easy to follow tutorials that make the cutest outfits. The best part though-her tutorials are easy! Even for the beginner!

My latest sewing adventure has been her "Good Looking" pants. I made my first pair with some scrap home decor (heavy weight) fabric. The pattern on the pants is a bit crazy, but they did turn out super cute! I used a pair of stretch leggings as my template-which made the pants a bit snug. The second pair I made, I added too much and now they are a bit big! One more try and I'm sure I'll get it just right.

My tips?
*Make sure you exaggerate the steep rise in the back of the pants. Both pants on G are just a bit small in the butt because of her diaper booty. Better big than small-next time I'll
exaggerate the steep rise even more!

*I used home decor fabric and it worked great!

*Make sure you don't do two right pant legs...that's what I did the second time. Frustrating! (This was my fault...the tutorial is very simple, I was just rushing to get the pants done before nap time was over!)

Oh-you want pictures?! Of course!!! Here's the first pair made with my scrap fabric....


And the pair I made out of teal home decor fabric...they needed some major hemming!
After the hem, now off to take the sides in a bit :-)

I still need to add buttons. I'm debating between something simple like white or teal, or something fun & patterned?! What do you think?

And the sewing begins!!

I decided it was time to make a blog-solely for my sewing posts. I'm no pro and I make lots of mistakes-but that's the fun, right?

I'm a self-taught sewer. I took one class in college but didn't learn too much, I was a freshman that was way more interested in boys, parties, and friends. Since G (my daughter) has been born, I've become somewhat addicted to making clothes for her. I do sell some items in my GiaRoseDesigns Etsy shop, but I prefer to sew for fun and not to sell. It's much less stressful that way!

I usually don't make my own tutorials-I'll be sewing off of tutorials from other blogs (and I will be courteous enough to post links and credits to those bloggers!).

DISCLAIMER: Feel free to link my posts to your blog. However-ALL my pictures are off limits (meaning you are not allowed to copy, paste or steal them). Especially those of my tiny sweets, G (or Gianna, or G-G...you know, my awesome daughter).

Thank you for visiting!!