Pages

Showing posts with label tutorial. Show all posts

Saturday, November 26, 2011

DIY Cast for Doctor's Kit

Awhile ago, I made Gianna a Doctor's coat to go with her 
Doctor's kit I bought her for Christmas. 


And then this weekend my mom had this genius idea, to add her kit...
a DIY play cast!!

She bought some Go-Go boot covers on clearance after
Halloween.  First they were just going to be thrown in Gianna's
dress up bin, but they she mentioned I should just make them into a cast
for her doctor's kit! Can you say, genius?!

Mine were similiar to this, only it already had the elastic around the bottom.


I added elastic to the top, to keep it up the teeny tiny kiddo thighs. 
And ta da! Cheap, easy DIY Cast. The kids are going to love playing with this!

Thursday, November 10, 2011

Felt Flower Clips


Gianna is getting a bit of a mullet. I always have to pull her bangs 
back so her hairs looks a bit more 'tamed' (if that's even possible!)

A crafty friend of mine, Lindsey, at My Handmade Gifts
crocheted these adorable little flowers for me! I love them, 
and best of all they are so inexpensive (6/$8)!! Plus, they 
don't slip out of fine/thin baby hair because of the felt!
(Can you tell I'm just a little bit excited about this)

Here's a little tutorial on how to make your own. 

Supplies:
felt
crochet flower
embroidery floss
needle
hot glue
hair clip

First trace your hair clip onto the felt, twice. And cut them out.

Then you'll cut a little slit in one of the felt pieces, because
you'll slide the top part of the clip through it. 
(See picture for better explanation!)

Next glue the top piece onto the barrett. Try to 
stay away from the edges where the embroidery floss will be;
the glue makes it harder to stitch through.

Also, do not glue the felt onto the widest part of the barrett.
(again, see below)
Don't glue that part down yet!

Hair clip closed....
Hair clip opened, after gluing. 
Next you'll take your needle and embroidery floss.
Thread your needle and stitch around the edges, through both
pieces of felt. This is just decorative stitching for looks. 

Next you'll take the ends of your embroidery floss
and glue it between the felt and the wide part of the barrett.
This will just keep the floss from unraveling. 
Take the ends and hot glue it to the felt and barrett.


After gluing!
Next you'll glue your crocheted flower to the top of the barrett! 
And your done!! Tada!!


And don't forget to order your flowers from 
My Handmade Gifts! If Lindsey doesn't have any available
in her Etsy shop, just email her! She's so great 
and so fast at completely orders!

(And no, she did not ask or pay me to do this review!)
(I just love her stuff so much, I had to share!)

Saturday, August 6, 2011

T-shirt Upcyle

A friend of mine from our playgroup gave me a box full of plain colored knit tees 
to upcycle into something amazing. I was so excited! 

There were a few plain white tees in there that looked a little 'dingy'
(we all know we have them...the white tee that turned off-white
from spit up stains or has arm pit stains from chasing around
our kids in the backyard...ya I'm sure you have them too!)
I almost threw them out when I realized I could make a scarf out of them,
and then dye it an amazing color!


I took two old white tees that were about the same size. I cut off the bottom portion
(from the arm pit down). I cut along one side seam on each shirt and then sewed
the to shirts together-length wise to make one long piece of fabric.

Next I filled a pot with teal Rit Dye and placed the whole scarf in the pot.
After about 5 minutes I took out one end the scarf and continued taking more the scarf
out every 5 minutes until the whole scarf was out of the water. This caused a gradual difference in
color from dark teal to light teal! I like how it turned out, a cheap and easy way to dress up an outfit!


(You can't really tell the difference in color in this pic. The more it dried, the lighter the colors got...)


I also cut and knotted the ends to add some flare :-)

You could easily make an infenity scarf by just cutting off the bottom of a tee and 
dying it. No sewing needed!! I'm going to try that next....

Sunday, July 31, 2011

No Sew Ruffle Bib Tee

I was so excited when I looked at Targets ad this morning and saw all their 
plain fitted tees are $5!!! I went right away and I bought one...I may have to go back
and buy 5 more (but don't tell my husband!) I whipped up this awesome
no sew shirt in minutes. I love the simpleness of it, and how cute will it look
this fall under a cardigan or jacket? Ahh...I'm in love. 


Here's what I did! I went to Hobby Lobby and bought the ruffle fabric. It's $12.99
a yard but you can print a 40% off coupon on their website. You only need about an 1/4 of a yard.

I purchased a gray scoop neck tee from Target and some Wonder Under from Joann's (don't worry
it's only $9.99 a yard in the store and you only need about 1/4 yard, plus don't forget to use 
those coupons!)

I took my Wonder Under and placed it on top of my shirt, rough side down. 
Next I traced on the paper the neckline of the top and also how big I wanted
my 'bib' to be. 

Next following the Wonder Under instructions I ironed the ruffle fabric on to the Wonder Under.
Once it was ironed on I cut out the ruffle fabric along the lines I drew earlier, when I traced
the neckline and bib area of the tee. Now peel off the back of the Wonder Under and place
your bib onto the tee. Make sure you have it exactly like you want and then iron it on!
Make sure it pressed really well, especially if you aren't sewing along the edges. 

TA-DA! You're done!! 
(If any of these instructions were confusing please let me know and I'll clarify)


Make sure you wash it gentle cycle, inside out and line dry. 


If you want it to look fancier-here's a tutorial from Make it & Love it on how to sew it on.


Saturday, July 30, 2011

Lace Striped Tee-No Sewing Required!

I'm a tee and jeans kind of girl in the summer; anything more than that is way too much to handle while chasing around a bunch of crazy toddlers ;-) I decided this summer I'd whip up some cute embellished tees. 

A friend of mine bought this tee at JCrew. I really love the simplicity of it! And I knew I could easily make one!


Joann's & Hancock's have a bunch of their lace on clearance. I got mine for $.99! 

I purchased a tee from Target for $6 and got to work. At first I pinned the lace on and sewed along the edge, using my walking foot. Well somehow my pins came undone and the second lace line turned out bad!
See the big arch under the left bust area? Ugh. I tried to seam rip it which didn't work too well
because the sewing already caused tiny holes in the shirt. I knew I needed to do something different.

I pulled out my Wonder Under and ironed on the last strips! Simply iron on the Wonder Under onto the
lace, peal off the backing and iron the lace onto the shirt. Easy peasy! I wish I would have tried that first....

Oh well, I suppose I will just have to wear this shirt under a cardigan to hide my little mistake :-)


Sunday, April 17, 2011

Ruffle Sandal Tutorial


While shopping at Kohl's the other day I ran across these Vera Wang sandals-and instantly fell in love with the ruffles. G was being a crab pants (hello nap time!) so I headed for the check out without giving them another glance.

Then today I was in the mood to craft, but do something simple and the Vera Wang sandals
came to mind. I immediately started this project....


What you need:
*Scrap tulle, jersey knit and felt (or any fabrics-I just chose ones that didn't fray)
*Hot glue gun
*Paint (optional)
*Old, worn down sandals

I bought these sandals last year and wore.them.out. I was about to throw them out when I had an idea-I'll upcycle them!

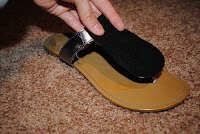
First-I traced around the top of the strap of the sandal with felt. I chose n
ot to cover the sides of the straps, but that is up to you. Then, I cut out the felt.


Second-I painted the straps that wouldn't be covered in fabric. I have no idea how well the paint will hold up, I'll keep you guys updated. I just used a wall paint I had in

the basement.

Third-While the straps dried I cut two piece of black tulle (15"x3" each) and two pieces of black jersey knit (15"x3" each). I sewed the tulle on top of the black jersey knit, making it ruffle as I went, simply by bunching up the fabric together under my foot on my sewing machine. This was the easy way out-but it turned out great! (Do this twice, one for each sandal)


Fourth-Now take the felt and sew the ruffle piece onto the felt.


Fifth-Make sure your paint is dry! Once it's dry cover the top of your sandal strap in hot glue and place the felt onto the hot glue.

Sixth-Go get a pedicure! Atleast I know after seeing these pictures, I need one!

Now model your shoes for everyone you know and redo every ugly, worn out sandal your family owns-you know you want to!! :-)

(Side note...this is one of my first tutorials so bare with me. If it's confusing please feel free to let me know, and I'll clarify!)