Pages

Showing posts with label link to tutorial. Show all posts

Wednesday, January 25, 2012

Denim & Lace

Even though the ground is still covered in snow, I can't help but think of spring. 


So I decided to whip up a pair of sweet little shorts. Last year I made a pair
of these knot shorts and fell in love with them. I couldn't help making
her a pair for this summer only with lace details this time! 

They are really simple to make; I made this pair in a little over an hour!
Perfect nap time project. 

can also make your own, following Shwin & Shwin's Drafting a Pattern tutorial.

Then I followed Grosgrains tutorial on how to make the knot shorts. 

The tutorial is so easy to follow and like I said before, they sew up quickly!


They are cute rolled up or kept down.
I think I prefer them rolled up to show off that lace!

Wanna know the bad news though? I made them too small! UGH!
They will fit if Gianna is potty trained by summer though;
maybe that will be my incentive? 

If not, I guess they were easy enough that making another
pair wouldn't be a huge deal. Guess it's time to move my patterns
from 18 month to 2T! 

Tuesday, January 10, 2012

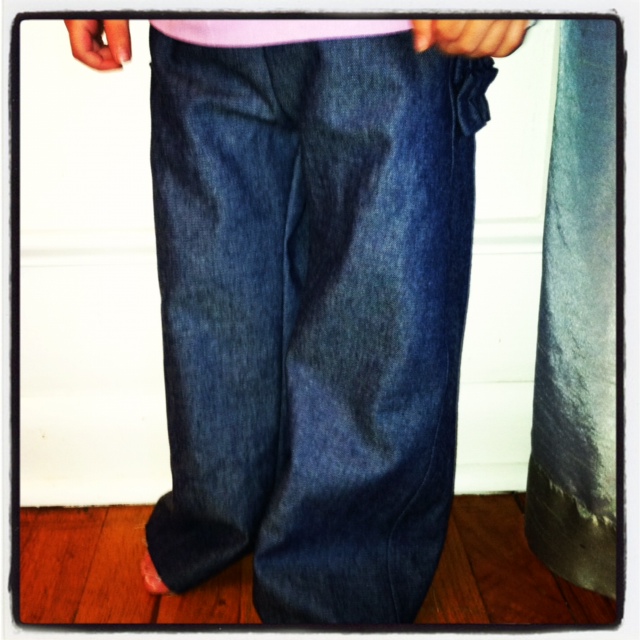
Ruffle Butt Jeans

I saw these adorable ruffle butt jeans (for toddlers, of course;-)) on Pinterest.


They are made by RuffleButts and cost $26.50. That's actually not a bad price;
but not one that I would pay! I love that they look like jeans but have an elastic
waist band so they are super comfy.

I just purchased a pant pattern from Lily Bird Studio. Right away I imaged
making my own, for way cheaper!

First I used some fabric that I purchased at Joann's. A blue stovepipe
denim, on sale, for $6.49/yd.
(And lightweight enough that my sewing machine can handle it!)


I used my Ben&Mia Pant Pattern but you can easily make your own
pattern following Made's pant pattern tutorial!

If you use the Ben&Mia pant pattern, just make sure you don't cut
out the pockets; unless you want front pockets!

I followed the pattern exactly, but to top it all off I cut 3 strips
of denim. About 2.5inches wide by 20inches long.

I sewed them length wise, right side together. Then turned them
right side out. You can use a ruffling foot. However, I just
gathered the fabric as I sewed so it ruffled up. A cheater way,
but much easier too ;-)


And there ya have it...a simple, comfy, easy pant! But also
adorably cute!!


Yes...same pant. Still working out the kinks of this new camera;-)


Monday, January 9, 2012

Sneak Peak...Spring 2012!

I'm all ready excited for spring! Maybe it's the warm weather we've had (55 degrees today!) or that all the stores are teasing me with all their spring collections! I don't know what it is, but I've already started planning Gianna's spring wardrobe. I thought I'd start  2012 off with showing you a sneak peak of what's to come on Gia Rose Sews! So here goes....

________________________________________________________________
Oh boy, I'm in love with a few pieces! One being this simple mustard top.
 

I thought I'd do a little pattern remix using Leila & Ben peasant top pattern. I'm going to mix it up a bit and do over sized 3/4 length sleeves and add some lace detailing. I'm envisioning this tunic top with a pair of cute white shorts.

_____________________________________________________________________

Next up will be a pair lightweight jeans with searsucker detailing. 
I love searsucker for summer, it's so lightweight and cool. 
I might just have to make a cute jacket out of some white and yellow print too...hm...

Back to the pants. I'm going to use new pants pattern from Ben & Mia
It's a great pocket pants pattern with piping details. 


Only picture them in denim and seersucker piping..

______________________________________________________

Another staple in Gianna's spring wardrobe will be a pair of lightweight
linen pants. I'm thinking maybe a super light khaki or maybe white
(I can spot bleach white so they may stay clean)


I'll probably use the same pocket pants pattern but remix it 
a bit to do square pockets and a drawstring waist!

_________________________________________________________
The next top I've been wanting to try for awhile, but haven't gotten around to it yet. 
It's actually a refashion for a plain tee that G already has...


The tutorial is by Make It & Love It. 

I also have a pattern for some leggings (by Lil Blue Boo)
 that I think I'll use to make Gianna a pair of matching ones! 

I haven't quite decided on the colors let...maybe a sweet light purple...

______________________________________________________________
I have a feeling alot of skirts will be in the works for Gianna this
spring and summer. She seems to be in love with anything that resembles
a tutu! 

When I saw this skirt on Pinterest I knew I had to remake it. 
Now I just need to think (or find) a cute top to match!


______________________________________________________________

And last (for now!) I found the perfect skirt tutorial for Gianna's
Easter outfit......

Simply Homemade has a free tutorial and
Violette Field Threads has a pattern too!


I just love it! Very simple but elegant.

____________________________________________________

Hope you enjoyed the sneak peak! Hope to see you a lot 2012!

Thursday, December 29, 2011

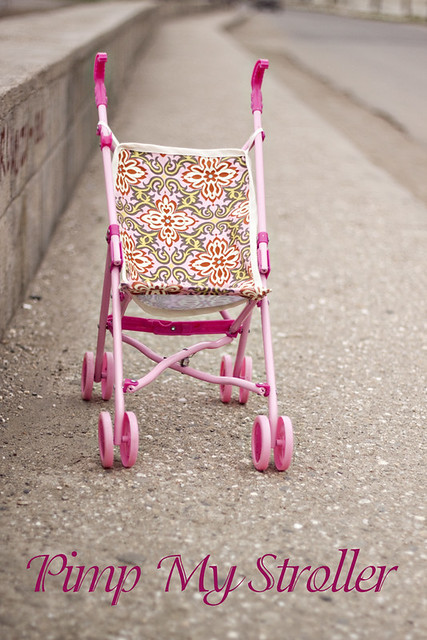
Stroller Refashion

And I'm back!! Who missed me?! 

I wish I could say I took a bit of time off from blogging to spend time with my 
family and just relax, but that would be a lie. I did spend lots of time with 
my family but not much relaxing was done... I had a million gifts to make, 
and buy, and wrap. 6 Christmas' to attend. Ya know, the usual.

But I'm back and should be back to regular blogging now!  

What was my first project after the holidays? A stroller refashion!

I was hoping to get this done for Gianna before Christmas but
that didn't happen. Oh well, Gianna didn't know the difference.
She's just happy she has a stroller that her babies don't fall out of!

Back to the stroller refashion....

A favorite blogger of mine, Sewing in No Man's Land, did a 
'pimp my stroller' post a while ago. 


Since then I've been wanting
to fix Gianna's stroller cover. We bought the stroller from Goodwill
and a few days later the cover started falling apart, of course!
But, for a few bucks, I couldn't complain. 

I grabbed some bias tape and scrap fabric from my stash
and set to work! The great thing about the 'pimp
my stroller' tutorial is that she even includes a free pattern!

It's a really easy tutorial to follow, even for the beginner sewer.
Plus, kiddos don't usually care if there are a few mistakes,
which makes this a great learning experience! 

Mine turned out ok...not as good as I expected.
But I did have a 18 month old trying to help, so I guess 
I can blame her for my mistakes ;-)


Sunday, November 20, 2011

Dress Up Bin

One of Gianna's big Christmas presents was a 
DIY Dress Up Bin. I love.love.love how it turned out.


My wonderful husband build, with a little help from Ana-White!
You can find the plans, building material list, approx. 
cost of materials, etc on Ana-White.com. Just search

I painted mine with left over paint from Gianna's Birthday Kitchen
and used my Cricut to cut out the letters. 

I also added two hooks, to keep hats, jewerly and other accessories!


The fun part was finding odds & ends to put in the dress up bin!
The 'bin' part is perfect to hold all those extra stuff you can't hang up!

I bought a few things from The Dollar Tree; a tutu, princess slippers,
crown, a clown tie (to dress up as a business man), and jewelry. 


I found a few good things (old costumes, mostly) at Goodwill, Craigslist and
 Garage Sales. It's a bit late now, but I picked out a few old costumes from
the clearance section at Walmart and Target. You can't beat $2 for a pretty
princess dress! 

Of course, I had to make a few things too! An apron/chef hat and, my 
favorite, the doctor coat! This week Walgreen's has BOGO Free
on some toys, including a great doctor's set! Talk about a cheap gift :-)


When Gianna's a bit older, and can really appreciate it, I'll make her
some beautiful princess gowns to add to her dress up bin! 

Photo courtesy of HomadebyJill


I can't wait to see her playing with all her new dress up clothes and 
accessories. I'm positive she'll love it!!

Saturday, November 19, 2011

Funky Elmo Pj Pants

I need to stop thinking of Christmas presents so early. Because
I just keep finding more ideas! Seriously, Gianna is beyond 
spoiled this year. It's getting a bit ridiculous. 

With that said, Jeff or I have made all her presents!
Stayed tuned, I'll be posting pictures of everything as
they get done!

Back to the Funky Elmo Pj pants!
 

I made Gianna and her dolly some matching pjs. 

For her doll (American Girl Bitty Baby) I used The Blueberry Moon's
Nakey Baby Pant Pattern. She even has a print out pattern,
which makes sewing up a pair of doll pants incredibly easy!
Her blog also features some other doll clothes, which all include
free printable patterns! Definitely jump over there and check it out!


For the top I took a newborn onesie and cut off the bottom,
to make it into a top for the doll. Then I appliqued a square
from the fabric! Easy peasy!!


Now onto Gianna's Funky pj pants! I'll admit, they are a bit...wild.
But no one will see them but us, so who cares?! Plus, G can't 
resist anything with Elmo. 

I found this pattern for free on Pinterest, you can bring it off
and then there's a tutorial on sewing it up. Super easy. 
Thanks FleeceFun for some great free patterns!

Photo from FleeceFun.com
The pink with lace is pretty cute!


Gianna is in size 12-18month (18 months old). I used the 2T
pattern but took off a 1/2 inch on the sides. I shouldn't have done 
that though. Right now they fit perfect, but probably not for long!

I tried them on Gianna, just quick enough to snap a few pics
and make sure they fit. She won't remember on Christmas, right?!


They look a bit crazy and wild! Next time I'll make them with 
a simpler fabric. Otherwise, they are the perfect pj's! 

I may have to make her a pair like the ones pictured about...they are 
pretty dang cute!


Monday, November 14, 2011

The Lovebird Tunic

When I saw the "Lovebird Tunic' that Jess over at
Craftiness is Not Optional made, I knew I had to make one!

Better yet, I knew that I had some fabric in my stash that would work perfect!

Keepsake Calico Fabric-Green Berries
from Joann's

Jess has a tutorial to make your own Lovebird Tunic. I made one 
for G, and although the neckline is a bit messed up, I love it!


She wore it the other day with jeggings and boots...oh my goodness.
She looked freakin adorable! I snuck some pics at the mall of her. 
Yup, I'm that crazy mom.

Checking herself out in the mirror at Gap.
Gotta be just like mom! Putting
on some lip gloss after lunch!

Wednesday, November 9, 2011

Upcycling Infant Sleepers into Doll Clothes

Gianna is really getting into playing with her dolls. Of course, my mom
has to spoil her for Christmas and get her an American Girl Bitty Baby!

I have one from when I was little and it's getting a little worn out. 
I'm glad I have it though, because that means I can make clothes 
for her baby as Christmas presents! 

While browsing Pinterest the other day I found this great 
tutorial, from Obsessively Stitching, on taking a infant sleeper and
 turning it into a doll sleeper!  It's very easy to do!


I started with a sleeper that I didn't care about and went to work. 
The snaps were a bit difficult to cut around, it would definitely be 
easier if I had zipper sleepers but for some reason we have none!

I also picked a  sleeper that was newborn size, so the neck/collar
area would not need to be sized down. 

Overall, it was really easy to do. Plus, dolls (and their mommies!)
aren't really picky on how perfect their clothes are made. That makes
it easier, small mistakes can be overlooked ;-)

I had to take a morning picture of
G and her baby! The outfit was then
whipped of her bitty baby and put with
in the present stash. She won't remember,
right?!

Tuesday, October 18, 2011

Little Girl Tie Top

I'm a lover of Pinterest. I find alot of my newest ideas and projects from there. 

You can follow me too if ya want! Get a sneak peak of my next big project!

Anyhoo..that's where I found this adorable sequin tie top. I fell in love. 


The best part? It was so simple and so cheap. I bought a shirt at a garage
sale for .75 cents. A packet of sequins for $1.50. 

Yes, I hand sewed each of those suckers on. I did, however, do it on our
4-hr drive to see Gianna's grandparents so it was a nice road-trip project. 

You can find directions here, at Little Pink Monster

I also made her a simple corduroy skirt with fake embroidery stitched pockets.

Add a pair of hand-me-down tights...total outfit cost about $5! Who hoo! 


Friday, September 9, 2011

Fall into Fall Skirt

I found this fabric at Walmart on clearance for $3.00/yd. I thought it would be perfect for 
a fall skirt; and at $1.50 for a 1/2yd I couldn't pass it up! 

I used The Long Thread's tutorial for a simple skirt. I wanted to dress it up a bit
so I added elastic only to the back section of the skirt and kept the front a 'flat front'. 

I just love how it turned out. It's cute now with a little tank and will perfect in the fall
with a warm cardigan and knit tights. Plus at $1.50, how can you not love it?!


The loves her green lizard!

I'm DONE mom...stop following me around!