Pages

Showing posts with label pattern review. Show all posts

Tuesday, February 14, 2012

The Carly Bubble Romper


My older sister is pregnant with twin girls so I couldn't resist making them some cute outfits! 

Her husband, E.J., said that he didn't want the girls matching all the time. I decided to listen
to him this one time and make the girls outfits that were the same style, but different fabric. 

I purchased this adorable pattern from Sew, Mama, Sew!. It's by Sis Boom and called 
the Carly Bubble Romper. It's a bit pricey, ok, really pricey. But totally worth it. There are 3 
different sleeve options and can be made in sizes preemie-24months. When I have
a tiny baby again this pattern will be used many times! 

The pattern itself is incredibly easy to understand. I only had two issues, one being that
 I didn't quite understand how to sew the legs holes so I did my own thing. I ended up 
turning them in and sewing two lines, then feeding the elastic through. 

The second issue was with the snap closure. The pattern says to use interfacing where the
snaps will be, but I think this caused the fabric to be too thick and I had some issues
getting my snaps to stay. I even had my hubs try a few of them...let's just say 
we went through two packages of snaps trying to get them on really tight! 
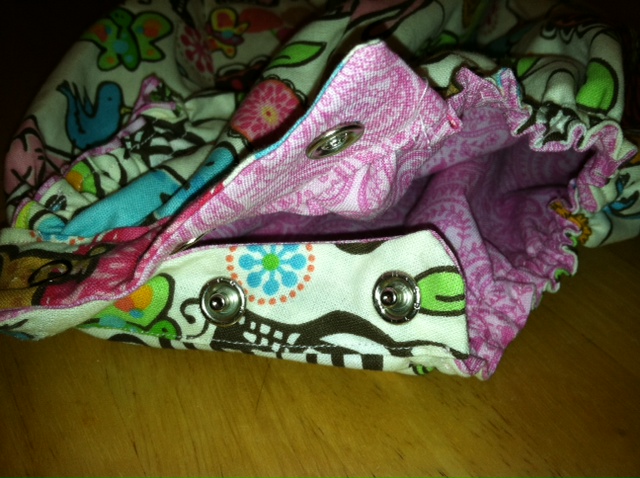
The next time I make this pattern I won't use the interfacing. However, I did
purchase a cheapo snap fastener from Walmart. It only costs me $12 and the
snaps were $3.58. If you have a heavy duty snap fastener than I'm sure you'll
be fine using the interfacing! 


You don't have to have a snap closure either. Buttons would be fine too! 

The romper is completely lined and will easily fit the twins for awhile.
I made size 3m but with it being a 'bubble' romper I think it could easily
fit 1month to 4months+! 


 Sorry, I can't figure out why some of the pictures are right side up! Dang blogger... 

All the fabric was purchased from Hobby Lobby. My favorite print, the pink/teal/black animals is from their spring collection at $8.99(!) a yard, so make sure you print off a coupon from their website! I, of course, printed mine off and then forgot to hand it over during checkout. Guess that what happens when you have a 3yr old and almost 2yr old not following directions...

Tuesday, October 25, 2011

The Abbey Jacket

Let's face it, Gianna has more than enough clothes. But I still really wanted to make this 
adorable "Abbey" jacket by Shwin&Shwin. It wasn't hard to find a customer to make a trial for!
Plus, for $4.95 for an amazing pattern I couldn't pass that up!

The jacket was super simple to make. Of course, I had to make things difficult and not follow instructions 
or pin things wrong.....ugh. I hate bad sewing days! 


Needless to say, that was not at the fault of the pattern or pattern maker! 

I do love this jacket. It's the perfect fall or spring jacket. 
I've seen many fabric variations such as Jess's from Craftiness is not Optional...

Adorable muted colors!

I love the button details...


And that it's made out of fleece which means no serging the edges!


I just love it. Plus the pattern comes in sizes 12m-4T!
I have a feeling Gianna will be wearing quite a few of these jackets to come!

To purchase your own pattern, visit Shwin's Etsy site.
*No, I was not paid or asked to do this review. Just love the pattern and had to share!


Wednesday, October 5, 2011

Sweet Pocket Pinafore

A few weeks ago I bought a Heidi & Finn pattern, the Sweet Pocket Pinafore
I originally bought this pattern to make my friend's daughter a Pebbles costume. Since I had the pattern on hand I decided to make Gianna a top. I wasn't so sure I'd love this style top on G, because it is a little juvenile for my taste. I prefer to dress Gianna like a little lady. However, after I finished it up and put it on G, I fell in love!! It's just so sweet, simple and comfy. Plus this top took a whole 45 minutes to whip up!


I made Gianna a size 2T since this pattern is 'slim fit'. I wish I would have had this pattern when Gianna was a baby because it would have been adorable with a little pair of ruffle bloomers underneath! The 12M size would make a perfect dress for a little baby. Maybe I'll make one for a baby gift....

Below are pictures of the top in action. I just love it!
The back crisscrosses but I forgot to get a pic of the back.
 Oops!

A tree Iowa girl, handing out by a corn field on her Grandpa's farm!


Friday, September 30, 2011

The Girly Cardigan, Take 2

Remember the Girly Cardigan I made with a pattern from Heidi & Finn. This time I did a slight variation; I didn't include the ruffle strip along on the edges, instead I added a crochet detail.

A few months ago I bought a ton of vintage crochet pieces. I wanted to add them on a few pieces in G's fall wardrobe, so I found a crocheted place mat and went to work. First, I cut all the pattern pieces for the pattern, including 2 extra front pieces cut from the crocheted placed mat. Second, I took the exterior fabric and crochet pattern pieces and sewed them together. After that I continued to sew the cardigan as instructed, excluding the ruffle piece.

At first, I wasn't sure what I thought of the cardigan. Once I put it on G, I loved it! She looked so adorable with it in her new Gap jeans. She wore this to church the other weekend and she got quite a few compliments on it!!

Someone figured out her nose has holes
that her fingers fit right in!


A cute little tuxedo-tail style back!


Monday, September 26, 2011

The Girly Cardigan

I purchased the Girly Cardigan from Heidi & Finn on Etsy. I LOVE all the adorable patterns they have. I picked this one because its the perfect accessory for fall/winter. I'm thinking the next one may be gray with a lace overlay on the front. But this one was made to go with the fall into fall skirt.

I reviewed the pattern itself in a preview post. Sewing up the pattern was fairly simple. The only part I had problems with was the ruffling. The instructions say to pin pleats into a strip of fabric to make the ruffle, but I simply did a basting stitch, pulling the threat tight on one end. (See a tutorial here) Once I made the ruffle I pinned it in place and sewed along the edges. However, I did a fleece fabric so I had a hard time keeping all the layers together and making sure I had sewn through them all. I'm sure a more experienced seamstress wouldn't have any trouble at all, but this part caused me some trouble. Plus, my ruffle was super ruffly which I'm sure didn't help. With that said, I'll still be making another one. Maybe without the ruffle? There's alot of variations you can use with this pattern!
Pics at the farm! She wanted to eat the corn
so bad!

The best part was when I put it on G, she loved it! It was so comfy and had plenty of room to grow! I have a feeling this will be a favorite sweater of hers!

Adorable details!
Poor baby girl was recovering from being really sick, she's just not herself yet!

Saturday, September 17, 2011

Urban Unisex Hoodie

I finally made the Urban Unisex Hoodie from Heidi and Finn. The first one I made didn't turn out 
that well. I used a print fleece with a knit lining. It felt incredibly soft and comfy but the thick layers
made the sleeves way too tight. I emailed H&F and they said the Urban Hoodie is a 'slim fit'. 

The instructions also say to use a zig zag stitch, I didn't do this on the second hoodie since I use
a walking foot when sewing with stretch fabrics. Otherwise the pattern sewed up like a 
dream! Very simple and quick. I did do a review when I cut out the pattern here. 

Here's my first try...
Cute but I think I like the hoodie better without a printed fabric. 


And take two:


I love the second one! I used a jersey knit for the outer layer and a cotton, quilting fabric
for the lining (from Hobby Lobby). I did increase the sleeve width by about 1/2inch. They
fit much better now. 


Everything's red!


Suckers, beads, what more can a girl want?!
G's favorite part of the parade...dancers!

Tuesday, September 6, 2011

Pattern Review: Heidi & Finn

Did you know Heidi and Finn is having a B2G1 sale?! Yup, buy two patterns and get one FREE!
I couldn't pass up this great sale so I splurged on a few patterns I've been wanting. 

Urban Unisex Hoodie Pattern; I've been drooling over this pattern for.ever. I'm
so excited to start making some sweet little hoodies for my baby G!

Cowl Neck Dress Pattern; I love that I could shorten this to make it into a tunic to wear
with leggings or a sweater! 

Girly Cardigan Pattern; I purchased this to make a cardi for G's skirt that I just
made her(post coming!). And every little girl needs a few ruffly cardigans for fall!

As soon as I received the three patterns in my inbox I started printed them out. That's when I realized
my first issue; the pages aren't numbered and the patterns aren't all labeled. Now, this wouldn't be a bad
thing if someone was organized but for me, I printed them out and then G found them and the 
next thing I know, I have a million pages all over my craft room floor. 

After I got them all sorted, taped and cut out things are looking up! I did label each pattern piece 
with what pattern the piece was too. I was kind of surprised H&F didn't do that. I store all my cut 
patterns in a filing cabinet but they definitely get mixed up every once in awhile. I love to label them
all with the size and what pattern they go to. I also wish the pieces were labeled with page numbers
so it was much easier to put the pieces together. Overall though, that wouldn't keep me from buying more!

I love H&F's patterns and they've had lots of rave reviews so I have very high expectations! 
That's all I got for now...off to bed and hopefully I'll have time to start sewing tomorrow!


Sunday, August 21, 2011

Pattern Remix-Yoga/Kimono Jacket

 I love Heidi & Finn's Comfy Yoga Jacket and I was this close to buying the pattern
when I realized how similar it was to the Hooded Jacket Pattern I had just purchased 
from DMK.   

It was actually incredibly easy to tweak the pattern. I made the jacket exactly as I 
did the first time (in size 2T though, fits great now with growing room!). Only this time 
I added a strip of jersey knit to each side seam of the top. The first two are placed on the inside side seams
of the the printed fabric and the last two are the seams where the top crosses over each other.
Does that make any sense? I included a picture that will make my attempt at directions make sense! 

The second time I made this top it went so much easier! I had the whole top finished in less than 
2 hours. Gianna looks adorable in it too! It will be the perfect layering piece for the fall 
weather that will be here before ya know it!


What a great model :-) And she may be a dentist when she grows up. She
loves to brush her teeth!


*Dear my kids has not asked me to review their pattern. I bough their pattern on my own and decided

to do a pattern remix with it. I was not compensated for my review.

Friday, August 19, 2011

DMK Unisex Hoodie Jacket Pattern Review

Last week I purchased a pattern on Etsy; the Dear My Kids 

I wanted to make G a cute fall jacket. I loved the double breasted
look of this jacket and that it's fully lined! (Too bad I made G's
too small so it's not double breasted, ugh!) I will definitely be making
another one...I was thinking a single layer fleece jacket...

Back to the pattern! The pattern was very well written and easy to follow. 
It didn't take very long to make (a couple hours?) which is something I love,
I get impatient easily and just want to see the outcome!

The pattern comes in size 12m-6T which is great. The only downfall is that it jumps from
12m to 2T. I didn't know which one to make (G is in between a 12m-18m right now) so I kind of cut out the pattern in between a 12m and 2T. I should have just gone with a 2T though, especially with the fleece lining
and wanting it big enough to fit over sweaters. I also didn't measure G to compare it with the chart to see what size I should make...oops! Told ya I was impatient! 

Overall I loved it. I plan to make some fleece jackets for this winter 
and cotton jackets in the spring! Overall definitly worth the $6. Especially since I plan to use it
until she's too big for a 6T.

I will definitly be buying more patterns from Dear my kids and I'll review them too!

I hate buttons and button holes. Disregard that I put them on
the wrong side....and that they aren't straight. 

Fully lined in fleece! G loves that it's so soft!

Bad view. And notice our topsy turvy?! Yup,
it didn't work for us! Nothing grew!


*Dear my kids has not asked me to review their pattern. I simply bought the pattern and decided to do
a review on my own. I am not being compensated for this review. 

Wednesday, August 10, 2011

Fleece Fall Sweatshirt

I got started on G's fall wardrobe! Tuesday night we went to Joann's and Hobby
Lobby to pick out a few cute prints to start with. I didn't want to go too crazy
because I know the new fall fabrics are still coming in! 

Anywho, where was I? 

I picked up a cute damaskish printed fleece from Joann's. 
Last spring I had purchased the McCall's sweatshirt/sweatpant pattern
and planned to use that to make this top. Once I started cutting  out my pieces
I realized even the size 1 was way too big.  So I grabbed a sweatshirt that fit G well
and sized down the pattern quite a bit (maybe a bit too much). 

There are so many fun things you can do with a simple sweatshirt pattern.
Add ruffles, pockets, buttons, multiple coordinating fabric, etc. I have a few
more fabrics to use to whip up more of these sweatshirts! 

Oh wait...maybe you'd like to see a pic of this top that I keep bragging about?

(please diregard the terrible pictures! It's way too hot out to make G model
her new fleece sweatshirt for me!)