Pages

Saturday, October 29, 2011

Happy Halloween!


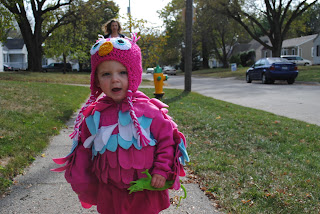
I made Gianna's costume this year and I have to say, I LOVE it!! 
She looks so adorable, if I do say so myself :-)

I'll admit that I didn't come up with this idea on my own. 
I found it through Pinterest. 

I did something similar to Pure Joy Events' Owl Costume.
She even has a template and tutorial on her blog! 

I didn't follow her tutorial, I just kind of sewed by the seat of my pants. :-)

Gianna costume was basically a sweatshirt from Walmart with fleece 'feathers' sewn
on. I also made wings which I sewed onto the sweatshirt also.

Her hat (which we lost on our walk to the library, ugh!!) was made by
my friend Lindsey at My Handmade Gifts. She does amazing work
and her stuff is so reasonably priced! 

I think she looks so adorable. Now if we can get a new hat before we
go trick or treating Sunday!


Tuesday, October 25, 2011

Chef Apron & Hat

Since Gianna has this adorable kitchen we made her for her birthday this year, 
I thought she needed a chef apron & hat to go with it!


A perfect addition to her Dress Up Bin she's getting for Christmas!

I found two incredibly easy tutorials online. 

One being from a crafty blog I follow and another from a blog I found 
on Pinterest

Both tutorials were incredibly simple. Best part was that I finished
both the hat and apron in about an hour! A quick nap time project!

I chose to do a simple apron (simply because I didn't have enough fabric
to make the ruffles!). The tutorial (from Babblings & More) is a super cute ruffle apron;
 and it's the perfect size for a 2 yr old! 


The Chef Hat, from Sewing in No Man's Land, was another simple tutorial.
 The only changes I made was adding a longer piece of velcro to make sure it 
fit Gianna's tiny head. It would even be cute (and easier for little ones to put on) 
with elastic inside the band. 


I really like how they turned out!! The best part
was that this project was free!! A friend of mine
gave me the fabric and ribbon! Score!! 


The Abbey Jacket

Let's face it, Gianna has more than enough clothes. But I still really wanted to make this 
adorable "Abbey" jacket by Shwin&Shwin. It wasn't hard to find a customer to make a trial for!
Plus, for $4.95 for an amazing pattern I couldn't pass that up!

The jacket was super simple to make. Of course, I had to make things difficult and not follow instructions 
or pin things wrong.....ugh. I hate bad sewing days! 


Needless to say, that was not at the fault of the pattern or pattern maker! 

I do love this jacket. It's the perfect fall or spring jacket. 
I've seen many fabric variations such as Jess's from Craftiness is not Optional...

Adorable muted colors!

I love the button details...


And that it's made out of fleece which means no serging the edges!


I just love it. Plus the pattern comes in sizes 12m-4T!
I have a feeling Gianna will be wearing quite a few of these jackets to come!

To purchase your own pattern, visit Shwin's Etsy site.
*No, I was not paid or asked to do this review. Just love the pattern and had to share!


Sunday, October 23, 2011

Pretend Play Doctor's Coat

Gianna's getting a dress up bin for Christmas and I wanted to make a few
things to go in it. Originally I really wanted to do princess dresses, but I think I will
save those for her birthday in May. She'll really love them then!

Instead I decided to do a few simple things. One being a 
doctor coat!


A friend of mine had some plain, white button up shirts that she no longer needed
and handed them down to me. I think cut along the sides and sleeves to make
it fit Gianna a bit better. The shirts were a Boys 2XL so they didn't really need 
to be taken in much. I drew on my picture of where I cut. Cutting some off the sleeves and
sides. Them shortening the sleeves and hem. Super simple!

Picture is after I hemmed the shirt.


Then for some added detail I did a little embroidery work. This is only my 
second embroidery project so it's still quite rough! However, Gianna will love
it (when's she older and can read! haha). 

All in all, an incredibly simple, but cute doctor's coat!

Friday, October 21, 2011

Revamped Dining Room

Do you ever get in a sewing rut? I felt like I was getting into one so I took a break from my machine...and decided to redecorate! We've lived in our home for 4yrs now and I was getting tired of the colors... plus I wanted something more calming, more cottagey, more kid-friendly.

You see, we live in an old township. Our house is old, which I love (and also hate sometimes!) but I didn't feel like our decor really matched our home. So over the last week or two I've been redecorating!

Before....
After!


I started in the dining room. We purchased a table/chairs a few months ago that I had been wanting to paint. I got the chairs painted and recovered them with plastic (hello kid-friendly!) and then Waverly Pom Pom Play in Spa fabric. LOVE IT!


I also did some thrifting with my mom and sister a few weekends ago. I picked up a bunch of knickknacks for cheap! I also fell in love with the Vintage Willow China. I told Jeff when he bought me my big, huge, old farm house I was buying a full set of that china ;-) But for now I purchased my first piece...at .50cents I couldn't pass it up!

Here's my new shelves... I just used my old shelves and repainted them. I primed them with Kilz Oil based paint (sticks much better to fake-wood surfaces). Then painted them Gris from Sherman Williams. I sanded them a bit to give them a more distressed/old look.

No, the bottom shelf isn't crooked. I have no idea what's going
on there!

The little turquoise box was something I already had, only it was dark brown. I repainted it a turquoise color and then watered down some brown acrylic paint. I painted the acrylic paint on, then before it drys; wipe some off. It gives items like this a distressed look. I love how it turned out! Plus, it was free!

As for my owl, I was going to paint it all white but my hubby likes it the way it is. What do you think?

That's my dining room! I pretty much love it now. Next I'll show you my entry area...this is my very favorite part of my redo :-)

Tuesday, October 18, 2011

Little Girl Tie Top

I'm a lover of Pinterest. I find alot of my newest ideas and projects from there. 

You can follow me too if ya want! Get a sneak peak of my next big project!

Anyhoo..that's where I found this adorable sequin tie top. I fell in love. 


The best part? It was so simple and so cheap. I bought a shirt at a garage
sale for .75 cents. A packet of sequins for $1.50. 

Yes, I hand sewed each of those suckers on. I did, however, do it on our
4-hr drive to see Gianna's grandparents so it was a nice road-trip project. 

You can find directions here, at Little Pink Monster

I also made her a simple corduroy skirt with fake embroidery stitched pockets.

Add a pair of hand-me-down tights...total outfit cost about $5! Who hoo! 


Wednesday, October 5, 2011

Sweet Pocket Pinafore

A few weeks ago I bought a Heidi & Finn pattern, the Sweet Pocket Pinafore
I originally bought this pattern to make my friend's daughter a Pebbles costume. Since I had the pattern on hand I decided to make Gianna a top. I wasn't so sure I'd love this style top on G, because it is a little juvenile for my taste. I prefer to dress Gianna like a little lady. However, after I finished it up and put it on G, I fell in love!! It's just so sweet, simple and comfy. Plus this top took a whole 45 minutes to whip up!


I made Gianna a size 2T since this pattern is 'slim fit'. I wish I would have had this pattern when Gianna was a baby because it would have been adorable with a little pair of ruffle bloomers underneath! The 12M size would make a perfect dress for a little baby. Maybe I'll make one for a baby gift....

Below are pictures of the top in action. I just love it!
The back crisscrosses but I forgot to get a pic of the back.
 Oops!

A tree Iowa girl, handing out by a corn field on her Grandpa's farm!


Monday, October 3, 2011

Oops...Even I make (BIG!) mistakes!

Alright, so that sounds a bit cocky. No, I'm not a professional seamstress but 
I can whip up a good outfit with decent skill! Almost all my projects have tiny imperfections but the project I just finished has a...very noticeable mistake. 

You see I've been wanting to make G a cute pair of dark brown cords to wear this winter.
I saw Dana's flat front pant tutorial and thought it was just what I was looking for! She has a pattern drafted for 2T-3T which is obviously a bit big for G. I wanted to try to scale down the pattern for an 18M size.

I also didn't want to waist a good piece of fabric so I tried it out first on some hand-me-down fabric from my 
mom (thanks mom!!).  So off I went cutting, tracing, cutting and pinning. I got the pattern 
down to the right size (check back for a tutorial on how to make an 18M size!) and started sewing.

Very quickly I realized I had used a back piece for the front and a front piece for the back! AH!!
Sure, I could seam rip it but I already sewn an adorable pocket onto a back piece too!

Well crap. Thankfully they were just pj pants and G will be sure to wear them, just not to any sleepovers!
I didn't want the pants to go to waste so I also tried a few different sewing techniques.

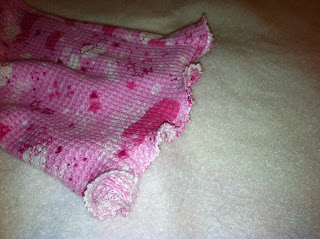
I did a lettuce edge on the bottom of the pants so I wouldn't have to hem them. 
This is actually incredibly simple to do! Simply set your machine the narrowest zigzap stitch and stretch the fabric as you sew (lettuce edge can only be down with stretchy fabric such as a knit). The edges will curl up and give it a nice finished look!


Since I used a waffle knit fabric that won't unravel I decided to do a simple shirred waist. I sewed elastic
onto the waist, but pulled the elastic tight as I went. This make the fabric stay flat but the elastic stretches out. Once you're done the elastic will spring back to it's original, stretchy self! Tada!

I hope I didn't lose you in this post. To top it off, here's the "big mistake" pants!