Pages

Monday, November 14, 2011

The Lovebird Tunic

When I saw the "Lovebird Tunic' that Jess over at
Craftiness is Not Optional made, I knew I had to make one!

Better yet, I knew that I had some fabric in my stash that would work perfect!

Keepsake Calico Fabric-Green Berries
from Joann's

Jess has a tutorial to make your own Lovebird Tunic. I made one 
for G, and although the neckline is a bit messed up, I love it!


She wore it the other day with jeggings and boots...oh my goodness.
She looked freakin adorable! I snuck some pics at the mall of her. 
Yup, I'm that crazy mom.

Checking herself out in the mirror at Gap.
Gotta be just like mom! Putting
on some lip gloss after lunch!

Thursday, November 10, 2011

Felt Flower Clips


Gianna is getting a bit of a mullet. I always have to pull her bangs 
back so her hairs looks a bit more 'tamed' (if that's even possible!)

A crafty friend of mine, Lindsey, at My Handmade Gifts
crocheted these adorable little flowers for me! I love them, 
and best of all they are so inexpensive (6/$8)!! Plus, they 
don't slip out of fine/thin baby hair because of the felt!
(Can you tell I'm just a little bit excited about this)

Here's a little tutorial on how to make your own. 

Supplies:
felt
crochet flower
embroidery floss
needle
hot glue
hair clip

First trace your hair clip onto the felt, twice. And cut them out.

Then you'll cut a little slit in one of the felt pieces, because
you'll slide the top part of the clip through it. 
(See picture for better explanation!)

Next glue the top piece onto the barrett. Try to 
stay away from the edges where the embroidery floss will be;
the glue makes it harder to stitch through.

Also, do not glue the felt onto the widest part of the barrett.
(again, see below)
Don't glue that part down yet!

Hair clip closed....
Hair clip opened, after gluing. 
Next you'll take your needle and embroidery floss.
Thread your needle and stitch around the edges, through both
pieces of felt. This is just decorative stitching for looks. 

Next you'll take the ends of your embroidery floss
and glue it between the felt and the wide part of the barrett.
This will just keep the floss from unraveling. 
Take the ends and hot glue it to the felt and barrett.


After gluing!
Next you'll glue your crocheted flower to the top of the barrett! 
And your done!! Tada!!


And don't forget to order your flowers from 
My Handmade Gifts! If Lindsey doesn't have any available
in her Etsy shop, just email her! She's so great 
and so fast at completely orders!

(And no, she did not ask or pay me to do this review!)
(I just love her stuff so much, I had to share!)

Wednesday, November 9, 2011

Upcycling Infant Sleepers into Doll Clothes

Gianna is really getting into playing with her dolls. Of course, my mom
has to spoil her for Christmas and get her an American Girl Bitty Baby!

I have one from when I was little and it's getting a little worn out. 
I'm glad I have it though, because that means I can make clothes 
for her baby as Christmas presents! 

While browsing Pinterest the other day I found this great 
tutorial, from Obsessively Stitching, on taking a infant sleeper and
 turning it into a doll sleeper!  It's very easy to do!


I started with a sleeper that I didn't care about and went to work. 
The snaps were a bit difficult to cut around, it would definitely be 
easier if I had zipper sleepers but for some reason we have none!

I also picked a  sleeper that was newborn size, so the neck/collar
area would not need to be sized down. 

Overall, it was really easy to do. Plus, dolls (and their mommies!)
aren't really picky on how perfect their clothes are made. That makes
it easier, small mistakes can be overlooked ;-)

I had to take a morning picture of
G and her baby! The outfit was then
whipped of her bitty baby and put with
in the present stash. She won't remember,
right?!

Sunday, November 6, 2011

"Cheater" Embroidery

My very best friend from highschool is having a little boy
and I could not be more excited for her!! 

I made her a basket full of goodies...burp clothes,
clothes, onesie, a moby wrap (because every momma 
needs one!) and my favorite part of all, 
a personalized blanket. 


 I have no idea how to embroider so I made up 
my own way of doing it! And it turned out pretty awesome, 
ifIdosaysomyself! 

Here's the 'cheater' way that I embroidered.

First-I bought an embroidery ring from Hobby Lobby for under
$2.00. I also bought embroidery floss (.47 cents) and
took one of my hand sewing needles. 

I then used my Cricut to cut out the name Henry onto freezer paper. 
I used the 'wrong' side of the paper because I ironed it onto
the blanket backwards. If you're not familiar with freezer paper, 
that means I had it cut on the wax side instead of the paper side.

I then placed my freezer paper on my fabric, wax side down, 
and ironed. This was going to be my stencil for embroidering. 


I then traced around the letters on the freezer paper with a pen (you could
also use the dissolving ink pens, if you have one on hand). 
Then you can remove your freezer paper. 

After the letters were traced, again on the wrong side of 
the fabric, I started to stitch!

I did a long stitch on the right side of the fabric and a 
short stitch on the wrong side. See picture above,
you don't see alot of the thread. Verse the picture
below where you see alot of the stitching. 


I continued stitching the whole name. Once I was done
I used a iron-on interfacing. This keeps the stitches from coming
out during wear/washes. Just iron it onto the wrong side
of the fabric, where the embroidering is. 

Then, I sewed my blanket together! 


It was so simple and easy. This may be a staple for future
baby showers! 

And bare with me, this probably wasn't the 
easiest tutorial. Please feel free to contact me if you have
any questions!

Ana White- 6 cube bookshelf

Have you been to Ana-White.com? If not, stop what you're doing
and go there...now!! 

This site is amazing. It has step by step tutorials on making
just about any furniture item you can think of! I'm addicted
and hope to never buy a piece of furniture again....ok,
that's a lie. I just bought an amazing island for my kitchen.
But somethings I'm just not capable of making! 

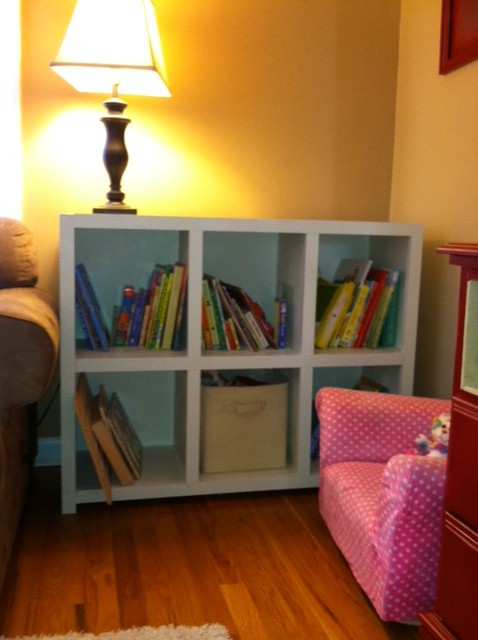
Back to the bookcase. We have a corner in our living room
that I wanted to make into a little nook for Gianna to keep her 
toys and books. However, the bookcase that I wanted was a bit
too expensive for me. 
Target $189.99


Then I found the exact.same.bookcase on
Ana-White.com for half the price! Right away I sent Jeff to the 
hardware store for supplies!


The total cost of the project was around $60 and took Jeff (and his 
friend Alec) about 3hrs to make. It fits perfectly in the corner and my
favorite part is that it hold the cloth bins from Target!


And for the finished pictures.....

TaDa!!


Gianna's pink chair is from Amazon.com. They
have a bunch of different colors available! 
We really love it, I only wished that the cover
came off for easy washing!

The only thing this bookcase needs is a little 
something on top. I'm thinking about doing some 
yarn wrapped letters similiar to these...

photo from sarahortega.com

Maybe have it say "READ"...

Thursday, November 3, 2011

NICU Smock

When my cousin pinned this on Pinterest I knew it was something
I wanted to do too!  

The pattern is for a NICU smock, for babies 3-7lbs. They say parents
feel better when they see their tiny babies is something other than a hospital
gown....I knew I just had to make some adorable smocks for 
all those tiny babies!! 

First, I called one of the hospitals and spoke to a nurse in the NICU.
After I explained the smock, the nurse was really excited about it.
She said she would love to have some!

I would love to hear if any of you made some to donate to your local
NICU! The pattern is very simple and sews up really fast. 
I even made a few out of fleece so I didn't have to do any hemming
or serging. 

I had to do one in Gianna's favorite print...Elmo!


I used some of my fleece remnants!

And bought a few cute boy prints too!


Saturday, October 29, 2011

Happy Halloween!


I made Gianna's costume this year and I have to say, I LOVE it!! 
She looks so adorable, if I do say so myself :-)

I'll admit that I didn't come up with this idea on my own. 
I found it through Pinterest. 

I did something similar to Pure Joy Events' Owl Costume.
She even has a template and tutorial on her blog! 

I didn't follow her tutorial, I just kind of sewed by the seat of my pants. :-)

Gianna costume was basically a sweatshirt from Walmart with fleece 'feathers' sewn
on. I also made wings which I sewed onto the sweatshirt also.

Her hat (which we lost on our walk to the library, ugh!!) was made by
my friend Lindsey at My Handmade Gifts. She does amazing work
and her stuff is so reasonably priced! 

I think she looks so adorable. Now if we can get a new hat before we
go trick or treating Sunday!